1. Keutamaan fungsi Photoshop ialah sebagai program aplikasi...
a. pengolah grafis bitmap
b. pengolah grafis vektor
c. pembuat grafis vektor
d. penyusun pixel
e. pembuat pixel
2. Tipe file yang didukung program Photoshop...
a. MPG, JPEG, AVI
b. WMA, TIFF, PNG
c. DOC, XLS, PPT
d. JPG, TIFF, PNG
e. WMV, AVI, MPG
3. Tool yang digunakan untuk membuat area selection dengan bentuk bebas adalah..
a. move tool
b. marquee tool
c. lasso tool
d. slice tool
e. crop tool
4. File yang dihasilkan oleh Photoshop berekstensi..
a. .doc
b. .xls
c. .jpg
d. .psd
e. .psp
5. MOde CMYK dalam Photoshop berarti...
a. CYAN MAGENTA YELLOW BACK
b. COLOUR MANAGER YELLOW BACK
c. COLOUR MAGENTA YELLOW BLACK
d. CREATOR MANAGARY BACK
e. COMBINE YELLOW BACK
6. Istilah dalam Photoshop untuk memutar objek tegak lurus berlawanan arah jarum jam adalah..
a. 90 cc
b. 90 ccc
c. 90 cw
d. 90 ccw
e. 90 o
7. Tanda gembok di samping kiri nama layer berarti..
a. Link/Unlink
b. Visible/unvisible
c. Lock/unlock
d. Distribute
e. Fill
8. Tool untuk menggeser bidang kerja disebut..
a. marquee tool
b. hand tool
c. crop tool
d. slide tool
e. pointer tool
9. Pallete yang digunakan untuk mengatur besar kecilnya tampilan ukuran gambar dalam kanvas disebut..
a. Info
b. Layer
c. Navigator
d. Path
e. Channel
10. Yang tidak termasuk program editing gambar adalah..
a. Adobe Photoshop
b. ACD Fotocanvas
c. Corel Draw
d. Adobe Acrobat
e. Corel Capture
13 Desember 2009
Soal Photoshop
20 Oktober 2009
chemistry experiment
CELL ELECTROLYSIS
I. THE AIM
The aim of this experiment is to know the changing of salt solution (NasSO4 and KI) after electrolysis process.
II. BASIC THEORY
Electrolysis is one of electrochemist reaction. In electrolysis process, the electrics are used to do unspontaneous redox reaction. So, it changes electric energy into chemist energy.
Electrolysis doesn’t need the salt bridge. The main components are tube, electrode, electrolyte solution, and power supply. Electron (electric charges) will enter to the solution through the catode. The reduction will be happened at catode. Electron will be released at anode. So, the oxydation will be happened at anode. Catode’s charge is negative, while anode’s charge is positive. Kation will be reducted, and anion will be oxydated.
Electrolysis is accorded to the electrode. There are two types of electrode, inert and active. Inert electrode (such as C, Pt, Au) will not be reacted. Active electrode (every logam except C, Pt, Au) will be reacted.
Reaction in catode is accorded to the kation. If the kation solution belongs to active logam (IA, IIA, Al, Mn), so water will be reducted. But, if the active logam is in solid condition, it will be reducted. If the solution is acid (contains H+ ion), it will produce H2 gas. Every ion except the ion above will be reducted into it’s logam compound.
If the electrode is inert, reaction in anode is accorded to the anion. Anion belongs to oxy-acid (such as SO42-, NO3-, PO43-) will not be oxydated. So, the water will be oxydated. The solution contains Halida ion (such as F-, Cl-, Br-, I-), will be oxydated into their compounds. Base solution (contains
III. 
 INSTRUMENTS AND MATERIALS
The instruments are
1. U-tube
2. Beaker Glass
3.  Measurer Cylinder
4.  Drop Pipette
5. Test tubes
6. Power Supply
The materials are
1. Carbon Electrode
2. Na2SO4 0,1 M 50 mL
3. KI 0,1 M
4. Universal Indicator 10 mL
5. Fenolftalein 10 mL
6. Amylum 10 mL
IV. WORK STEPS
1. Na2SO4 Electrolysis
a. Adding 10 drops of universal indicator to 50 mL Na2SO4 0,1 M.
b. Pouring the solution into U-tube.
c. Electrolyzing the solution until the color changes around the electrodes.
2. KI Electrolysis
a. Electrolyzing KI 0,1 M until the color changes around the electrodes.
b. Moving the solution from catode space into 2 test tubes (each tubes ±20 mL).
c. Adding 2 drops fenolftalein into the first tube, and adding 2 drops of amylum into the second tube.
d. Repeating the steps for solution from anode space.
V. THE RESULT
1. Na2SO4 Electrolysis
The color before electrolysis process was dark green.
The color after electrolysis process were purple in catode space and red in anode space.
2. KI Electrolysis
| Space | The Color after | ||
| Electrolysis | Adding of PP | Adding of Amylum | |
| Anode | Yellow | Yellow | Purplish blue |
| Catode | Transparent/No color | Pink | Muddy white |
VI. THE ANALYSIS
1. Na2SO4 Electrolysis
§  The Formula of Electrolysis
2Na2SO4(aq) → 4Na+(aq) + 2SO42-(aq)
Catode : 4H2O(l) + 4e → 2H2(g) + 4OH-(aq)
![]() Anode : 2H2O(l) → 4H+(aq) + O2(g) + 4e
Anode : 2H2O(l) → 4H+(aq) + O2(g) + 4e
2 Na2SO4(aq) + 6H2O(l) → 4NaOH(aq) + 2H2SO4(aq) + 2H2(g) + O2(g)
§
§ H+ will be formed in anode space.
§ In anode space, the color changes from dark green into red. It means that the solution become acid, and form H2SO4.
§ In catode space, the color changes from dark green into purple. It means that the solution become base, and form NaOH.
2. KI Electrolysis
§  The Formula of Electrolysis
2KI(aq) → 2K+(aq) + 2I-(aq)
Catode : 2H2O(l) + 2e → H2(g) + 2OH-(aq)
![]() Anode : 2I-(aq) → I2(g) + 2e
Anode : 2I-(aq) → I2(g) + 2e
2 KI(aq) + 2H2O(l) → 2KOH(aq) + H2(g) + I2(g)
§ In anode space, there will be I2. It’s proved by the changing color into purplish blue after the adding of amylum.
§ In catode space, there will be H2 gas because of water reduction. The color will be change into pink after the adding of PP. So, it becomes base (KOH).
VII. THE CONCLUSION
1. After electrolysis process, Na2SO4 will form acid solution (H2SO4) in anode room and base solution (NaOH) in catode room.
2. After electrolysis process, KI will form I2 gas in anode room and H2 gas in catode room. KI also become base solution (KOH) in catode room.
VIII. THE REFFERENTION
Purba, Michael. 2004. Kimia 3A untuk SMA Kelas XII.
Purba, Michael. 2007. Kimia 3 untuk SMA Kelas XII.
18 Oktober 2009
How to make a violin??
I love listening to the music, especially classical music..
I have two violins, a Cremona and an electro-violin Sky-Lark, cheap but good..
I'm not good at it, but having them is my dream..
I've got an article about violin, at theviolinsite.com.. you should visit it too..
Have you ever wondered how to make a violin? This section not only shows how to make a violin, but explains about famous violin makers and types of violins.
Famous Violin Making Links: | Types of Violins:
|
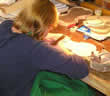
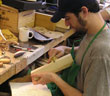
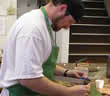
The Peter Prier Violin Making School in Salt Lake City, Utah has taught close to 500 luthiers over the years. There are over 130 violin makers from around the world who have graduated from the school, some very well known for their fine instruments. The following images, from the Prier Violin School, show the process of making a violin from start to finish.
|
|
|
|
 5. A thin wooden lining is placed inside the ribbing to reinforce the violin when the mold is removed. 5. A thin wooden lining is placed inside the ribbing to reinforce the violin when the mold is removed. |
|
 7. The wood is "arched" or carved into the correct shape. Then a channel is cut along the perimeter of the top of the violin for the purfling to be placed into. 7. The wood is "arched" or carved into the correct shape. Then a channel is cut along the perimeter of the top of the violin for the purfling to be placed into. | 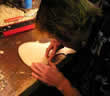 8. The purfling is placed into the channel and more arching is done to smooth the shape of the top and bottom of the instrument. 8. The purfling is placed into the channel and more arching is done to smooth the shape of the top and bottom of the instrument. |
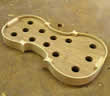
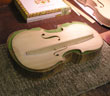 9. A bass bar is then added to the underside of the top of the violin. 9. A bass bar is then added to the underside of the top of the violin. | 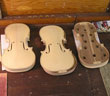 10. The body of the violin is now complete (3 violin pictures) 10. The body of the violin is now complete (3 violin pictures) |
 11. The scroll is then carefully sized. An error as small as a millimeter can completely change the feel of a violin. 11. The scroll is then carefully sized. An error as small as a millimeter can completely change the feel of a violin. |
|
|  14.Once pieces of the violin are finished, the instrument is carefully glued. Clamps are placed along the instrument until the glue dries. 14.Once pieces of the violin are finished, the instrument is carefully glued. Clamps are placed along the instrument until the glue dries. |
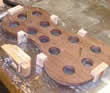
 2. Ribs for the C bouts are bent into shape using a special iron.
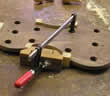 3. C bouts are then attached with glue to the violin mold and clamped into place
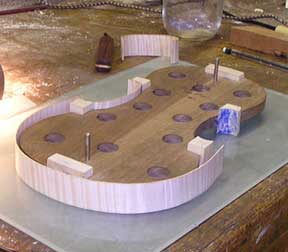 4. After the C bouts are in place, the rest of the ribbing is attached to the blocks.
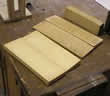 6. Wood is then chosen for the top, back (Spruce), and scroll (Maple) of the violin. The top and back can be made out of one piece of wood or two pieces glued together.
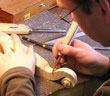 12. The scroll is then carved into the desired shape.
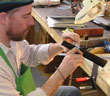 13. The fingerboard, made of ebony, is carefully shaved into shape
first post..
Here I am..
This is my new blog, adinda-larastiti.blogspot.com
I've made a blog before, adindaputrilarastiti.blogspot.com
But, I got a lot of bad things from there..
So I'll start a new day, a new life..
I'm Adinda Putri Larastiti.
I like being called Dinda.
I was born in Kebumen, July 9, 1992.. so I'm seventeen years old now.. Yiihhaaa!!!
Just an ordinary SHS student.. I have been studying in SMA Negeri 1 Kebumen, or in English: State Senior High School 1 Kebumen.. and I'm on 12 grade, the last grade..
Pray for me to get good final exam's scores!!! Amin..
Next year, I'll enter university.. but I still don't know what university, what faculty, where, etc..
I should decide it now..
Hope I can get the best!!
I live in Kebumen, small town in south of Central Java, Indonesia..
I have been living here still I was a baby.. hahahaha...
I live with my parents, my 2 old sisters, and my brother..
so I'm the last child and the fourth child in my family..
so, this is me..
Dinda..
